by Tim Gillespie
Learn how to solo once and for all!
Soloing is like learning to talk. Knowing the words in not enough. You have to be able to form phrases in the key and then transform them into statements. There is no time to read music notation or learn where the notes are when forming a solo. You have to show up with this information already in place. Building Blocks will show you this using images because once you have the image in your head, you know exactly where to go and you can do it on the spot.
There is nothing like it and nothing can make up for it. For $20, you can put this all to rest right now. Pick up a set today.
eBooks are delivered instantly!
When I construct solos I usually start in a framework. This gives me a point of entry into the thought processes I use to create leads. However as I have said before, it is not wise to blindly substitute a scale for the solo. Not all parts of the scale will yield the most favorable results. There are notes in a scale that must be managed. If you insert these notes blindly you will no doubt hear things you do not like.
Remember in any key, the seventh degree is unstable. So you have to be careful when you insert this note in a solo. This rule does not only apply to the seventh degree. It can apply to any note away from the focus of the music. If you are working with a particular group of notes and you start to insert notes outside this subgroup, even if it is in the scale, the results can be hard to predict. You will definitely pull the attention away from the grouping of notes and ask the listener to consider tones apart from the mood.
The opposite is also true. If you are working with a grouping of notes and you construct a solo using these notes, you may strike a synergy with the chording. You may feel some playful pertinent statements erupting from your experiment.
You can also play the same notes as the chording uses, only an octave or two higher or lower, than the chording. This can be an effective way to be synergistic yet separate. You are playing the same notes, only you are working in a separate octave.
While these concepts can be daunting and hard to grasp as a beginner, these are the life blood for experienced soloists. These different ways of contributing notes are some of the tools available to spice up songs.
So this month we will look at carving solos from structures in an attempt to understand the song creation process a little better. But first I would like to give you some things to consider.
A person who is actively playing scales and strengthening their coordination and familiarity with scales will benefit from this type of discussion. The notes are only a part of the entire process of creating solos. A person must breathe life into this process and that is facilitated by the strength in your fingers. The wonderful sounds we are after are there, but they must be coaxed into coming out. The player is the person pushing the agenda, not the guitar. If you strengthen your hands, you will one day pick up the instrument and command it to do very specific things. The control in your hands is what makes this happen. You put the control in your muscles by becoming very familiar with scales. I have also said many people think that after they play scales for a year of more, they know how to do it. In fact the level of familiarity with scales will continue to grow. Do not underestimate this.
If you are actively playing scales, the meaning of this column may continue to grow for you. In six months you may be able to execute these examples in a more meaningful way than today. So I suggest coming back and reexamining these concepts as you get better.
Also my suggestions are going to be general rather than specific. Of course I will give you some exact pathways to travel, but I strongly suggest you come up with your own. Work in the general area I describe, but construct your own leads too. Why? Here is why! If you are actively playing scales you are developing your skills and muscle groups. In a short amount of time you will start to get familiar with some moves. Which moves will vary from person to person. The point is you will already have some moves you can execute with confidence. Exploit this! If you experiment with your own pathways, your muscles will get a chance to apply what they are learning. You will notice some moves are easy while some are harder. When your developing strength starts to kick in, your sound will change. Almost for sure you will notice this on the spot.
Once this happens you can breathe life into this exercise. My hope is that I will help you engage this process and show you direction that is uniquely yours. So make up your own paths and see what happens. If you are actively practicing scales, you may not like what you put down today, but with more work, you may like it next week or next month. You keep getting better and your work keeps changing. You start out modestly.
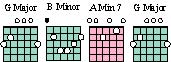
So lets break up the song into three different areas and come up with some guidelines for solo construction. Here is the progression from last month. Notice there are three pictures of scale graphics. These are the areas where we will begin to construct solos.
The first solo will be an phrase to introduce the lead guitar. This phrase should be unassuming and tasteful. At first you do not want to take control of the music. You are trying to inject a simple passage that will tell the listener there is another guitar present and begin to overlay a line that will influence the music. You may start to weave a melody.
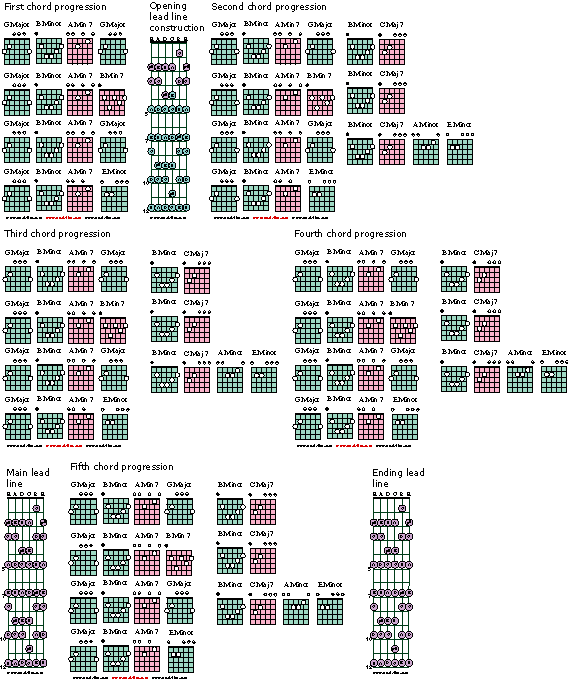
When I think about the typical construction in a song, this is how I break it down.
1. Opening solo to introduce the lead guitar. This statement starts low and emerges with the melody of the song. Sometimes you may allow the song to set the tone first and then bring in the second guitar.
2. The second solo may be the centerpiece of the lead line. This is the main solo that will convey the feelings and influence of the solo artist. This solo may start low and work to a climax or it may be smaller statements that blend in to a conversation. Pay attention to how you climb in pitch. Use this as a tool.
Solos don't usually start out with the highest pitch, they work up to it. Build your solo so it starts out low and continues to climb higher going through two or more octaves. Try to plan to reach the highest notes near the ending and then move back down slightly to end it. Just something to consider trying.
3. Ending statements. The third and final solo in this case might be designed to leave a certain mood in the mind of the listener. These are the final statements the lead guitarist makes and they create a certain feeling. Maybe the solo continues to climb in pitch and volume, filling the song with tension to express anger. Maybe the solo is composed of short phrases that express a sense of leaving. Usually the melody lines have been established in the first and second solos and now we are punctuating them.
This can tell the listener the song is ending and leaving much as a train leaves the station. Metaphors can be easily transferred from a soloist to the listener if the guitarist sets up the solo in a way that communicates the meaning clearly. This is definitely an art form and you will not be able to do this unless you consciously work at this. It is not hard, it is just very specific. You must specifically work at this type of detail. Keep in mind this is an investment in your future. Once you have this skill, it goes with you. You can use it when you need and then you only need to give it maintenance time. This is necessary to keep the skill in working order. The huge quantities of time may only need be spent in the beginning when you are getting the skill up and running.
Keep in mind this month we are focusing on construction. I am not going to look at the details of phrasing. That is another skill that will be applied here. If you are interested in this, see the article on phrasing.
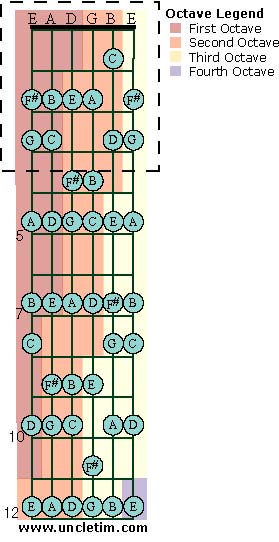
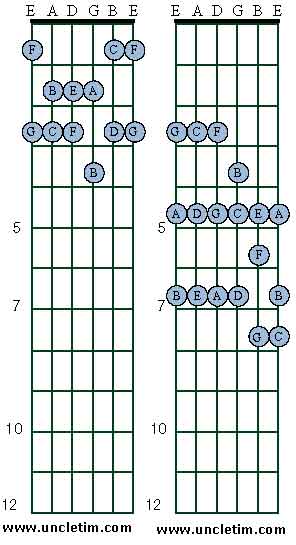
This is a guideline for climbing and descending in pitch. Notice within this twelve fret area, there are three octaves of E present. The lowest note is an E and three octaves higher there is another E note on the twelfth fret of the high E string.
You should also see that each string will repeat some of the same notes in the same octave. This is worthy of a little study so you understand how the guitar and scales increase in pitch as you climb higher and across the fretboard.
Notice how awkward it would be to work up the neck in only one color. It is far easier to work across the fretboard You can easily climb or descend and then move into another octave.
The Introductory Lead.
 Try developing an introductory lead using these notes. These are the notes
of the open string G major or E minor scale.
Try developing an introductory lead using these notes. These are the notes
of the open string G major or E minor scale.
Make this lead statement four to eight notes in length.
You can take advantage of the open string relationship and hammer some notes. You can also use pull offs. These tricks are not just used in Rock. They are useful in many different types of music and when used tastefully, they can add spark to music.
Place the opening lead statement over these chords. If you are having trouble doing this, have another guitarist play the chord progression and try to work over them.
In "The Need For Speed" this month, you will have several different lead statements to try to learn and play over this.
Before you go there, try a few of your own and see how they compare to the examples.
You might find you like your lines better.
Soloing Over Different Passages.


So when you reach this progression, try creating a solo over these notes inside the dashed line.
If you look at the notes in the chord and compare them to the notes inside the dashed lines, you will see both parts use the same notes. If you explore this concept with these chords, you should be able to create a synergistic line that plays off the chording.
I played a lot of lead lines to write this column, some of my favorites were within this area.
It really pays to have two guitarists try this. For this column I used a four track cassette player and dubbed in the leads.
This is a very valuable observation to be able to make as you play. If you are aware of where the other person is playing, you can go to that area and mimic his work or play off it. You can also avoid the area all together. Sometimes when you play directly over someone's chording using the same notes, you can add a muddy sound. Tones just crash together and create a bunch of boring combinations. You end up stepping on his arrangement.
When I play over the same notes as the rhythm guitarist and I get this muddy sound, I usually start to work towards another register (octave), either higher or lower, or I just jump there right away. This is an example of managing the sound by controlling the octave.
In order to climb out of the open string scales, you must be able to transition to the closed string scales. Remember we are playing in the key of E minor and the open string scale only climbs so high. You only get three notes into the third octave. To climb higher you will either have to climb the high E string or work there by climbing a closed string scale.
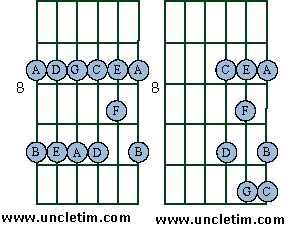
The Climax Lead.
This is an excellent way to transition to the higher registers. This scale leads directly to higher notes and creates an easy way to construct a solo that climbs higher as it builds.
The only problem is you have to be able to play three note per string passages like these.
This type of scale pattern is often a deal killer. Some people have never learned to play these extended stretch patterns so when they come to an opportunity to climb higher and craft the solo, they cannot do it.
I am often asked why a person needs to learn these scale patterns that have big stretches in them. This type of example illustrates you must be able to play these bigger scales because you will need them. They are excellent avenues for travel.
Inside this scale there are a lot of different combinations and pathways you can build interesting statements with. There are two particular position that I use extensively. One is for working the higher notes of this pattern, the other for working across the pattern.
 These
two areas are right next to each other, which means you can switch into
either one at the drop of the hat!
These
two areas are right next to each other, which means you can switch into
either one at the drop of the hat!
The first one is great for playing two tones at the same time, usually by barring two adjacent notes as you quickly move up and down the scale. There will be an example (#4) of this in "The Need For Speed".
This type of mini-barre is really helpful if you are working out of both a diatonic and pentatonic framework. You can switch back and forth and really combine interesting statements effortlessly. You can even work two frets lower and mix in the tonic note and chord.
The second example I use for higher notes. You can easily barre the C, E and A notes and run the scale or just pick out notes. If you are using the correct finger assignments when you practice this can be really fun and very little work. This is one of the first areas you may be able to work up some speed and maintain coordination.
With this technique, I can usually climb up and create a climax statement. I might need to climb up a few frets and use the notes of the next octave. A electric guitar solo would easily climb higher in to the next octave but an acoustic guitar may only be comfortable up to the fifteenth fret.
So try using this pathway as you build a climax statement that would start on the lower notes of the pattern.
The Final Lead.
Pick out your favorite leads as you work through this. Look at where in the progression they occur. Try to build a closing statement around the phrases and consider slowing down or decreasing the sound level.
If your second solo created a strong statement then you just need to repeat it and add some other features. You may want to repeat the main statement and change the last notes to alter the ending.
These general ideas are some of the choices for creation. There are a million others. You may work up a progression of chords that sets a unique direction or sparks a 20 minute jam session.
If you are having trouble constructing solos you like, try this. Tape the song, play it back and just play over the entire song. Don't worry about anything other than moving to different locations and trying to play within time. Sample everything and all parts of the fretboard. When you encounter something you like, milk it! Work in and out of the area until you are satisfied you found several nice statements.
I want to leave you with something I think about all the time. There are many things to work on, these passages are a good example. The most important consideration is to try lots of different exercises. They all help and you never know which ones will hold meaning to you until you try them. Work is the answer.
Sooner or later something nice will show up.
Home | FAQ | Purchase | UTFY | UTBB | UTBC | Tools | Flash Scales | Flash Chords | Video Scales | Newsletter | Reader Comments | About Us | Guitar Lessons | Teaching Center | eBooks | String a Guitar | Quick Guides | Search | Contact | Privacy Policy | Guarantee | Links | Login | Help Desk | Site Map
