The Easiest Way To Master The Fretboard!
The series was developed visually, because people natively think visually. You do not have to interpret a picture. You can understand it by looking at it.
And when you combine it with knowledgable text, the meaning and rules of music will jump out at you!
Immediately you will begin to see into the instrument and develop an understanding that is not possible any other way.
This is one of the main reasons this series of books carry a lifetime guarantee. We back up our words with an iron clad policy that has been in place for years!
eBooks are delivered instantly!
Article by Tim Gillespie
This month we are going to take a good look at a song that contributes much to a guitarist's development. This song was written circa 1850 and it often attributed to King Henry VIII. It can be played in a variety of styles including simple strumming. In this version we will use extensive right hand technique as we add flavor to a well known favorite. I claim this is my arrangement, but actually it is one of the standard interpretations with some right hand twists applied. I have played this song in several different styles but this is the only version I continue to play.
I play this song without a pick, just using my thumb and first three fingers, but you can modify this for use with a pick. I do think that playing this song with these exact finger assignments is somewhat harder with a pick and fingers. It seems to me to be well suited to the standard classical right hand technique.
This version of Greensleeves is in the key of A minor. It is played entirely within the first four frets. Therefore it is a good exercise for advanced beginners and it will require intermediate guitar players to use all their skills accurately or make mistakes. Since it occurs in the first four frets, and it is in the key of A minor, Greensleeves is an excellent song to help you see how it is carved right out of the key of A minor.
I have made every mistake known to man playing this song. I can remember practicing it back stage at a holiday banquet as I prepared to deliver it that night. When I first learned this song, I played all the chord notes at the exact same time by simply plucking the notes. As I became a better guitar player, I started to play them one note after the others. In time it became the only way I played it.
This song is often played as a Christmas song and the words can be found anywhere. In this column we are going to focus on the music.
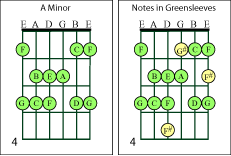 As I said
before, this song is a great example of how a song is carved right out
of a physical key. In this case it is the key of A minor that serves
as the template. The first diagram is of the natural A minor scale.
The second example are all the notes found in Greensleeves. All of the
notes are in the key of A minor except the F# and G# notes.
As I said
before, this song is a great example of how a song is carved right out
of a physical key. In this case it is the key of A minor that serves
as the template. The first diagram is of the natural A minor scale.
The second example are all the notes found in Greensleeves. All of the
notes are in the key of A minor except the F# and G# notes.
It is very common to see a song that behaves within the context of a key but also include notes outside of the key as this song does.
Reading Tablature
This newsletter uses two different tablature methods. The first examples explain the fretboard hand assignments, while the second example explains finger assignments for the picking hand. There is a legend for each one. I do this so the strategies for finger assignments can be fully explored too.
Tablature is read from left to right and the movement roughly equates to the timing of the song. This song is conveniently broken into four different parts. This makes it a little easier to get the handle on learning it. I call this isolating what you are working on. This is very helpful as you begin to understand how to play the tune. You can break it down and focus on each little part. Then when you are comfortable, you stitch them together.
If you are having trouble reading this tab, I suggest you go back and review how to read tablature.
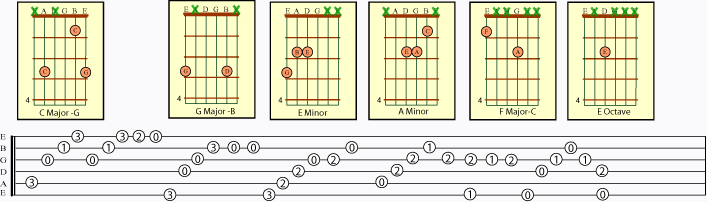
The Fretboard Hand
Fretboard Hand Legend
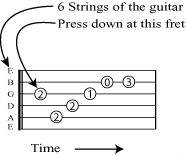 The fretboard hand tablature tells you exactly on what fret to press
the string down. In this example you would play the G string at the
second fret (A note, arrow pointing at the 2), then the A string at
the second fret (B). Then the D string at the second fret (E), and then
the G string at the first fret (G#) note. Then you would play the open
B string and finally play the B string at the third fret (D).
The fretboard hand tablature tells you exactly on what fret to press
the string down. In this example you would play the G string at the
second fret (A note, arrow pointing at the 2), then the A string at
the second fret (B). Then the D string at the second fret (E), and then
the G string at the first fret (G#) note. Then you would play the open
B string and finally play the B string at the third fret (D).
So with a little work you can easily learn to play this or any other song written in tablature just as you can with musical notation. There are some differences though. Notation usually does not tell you exactly where to put your fingers. It tells you the notes, but you have to decide what pathway you use. Tablature tells you just what to do (mechanically).
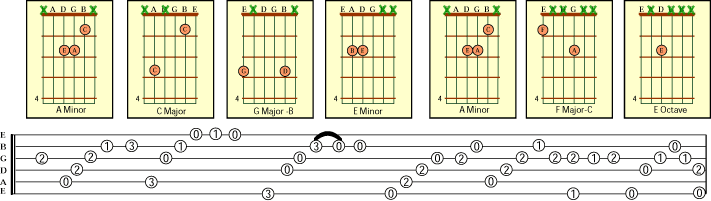
The Picking Hand
Picking Hand Legend
Pick Hand Legend |
| T = Thumb 1 = Index Finger 2 = Middle Finger 3 = Ring Finger |
 The picking hand legend tells you exactly which fingers to use to play
the notes. In this example you would play the first note by using the
second finger (2). Then you would use the thumb (T), the first finger
(1), the second finger (2) and then play the last two notes with the
third finger (3). Since this is a slower song, you can easily use the
same finger twice in a row.
The picking hand legend tells you exactly which fingers to use to play
the notes. In this example you would play the first note by using the
second finger (2). Then you would use the thumb (T), the first finger
(1), the second finger (2) and then play the last two notes with the
third finger (3). Since this is a slower song, you can easily use the
same finger twice in a row.
Listen To The Song
I have recorded this version in mp3 format. You can hear it below. I have also chopped it up into separate lines so there is no doubt about anything. This recording was done after playing the song twice and then simply recording it. It is meant to be very plain and not polished. I find it more meaningful if you hear how it sounds most of the time when I am just playing it. This gives a more accurate depiction of how your guitar should sound.
When I listen to something I am trying to learn that is polished, it adds another level of difficulty. Mentally it seems harder to duplicate the effort since it is so exact. This recording hopefully makes it feel like I am just playing a guitar in the chair next to you.
Listen to Greensleeves
|
Listen to Greensleeves |
Line 1 |
Line 2 |
Line 3 |
Line 4 |
The First Line - Fretboard Hand
Below is the first line of the song. The very first chord is the A minor chord. Notice you start with the A note. This sets the tone for the song and gives you a pretty good idea this song is in the key of A minor. Notice the chords are roughed out above the tab. Also notice you do not always play all the notes in every chord. We are going to be selective in which notes we will choose. Since we are finger picking, it is pretty easy to pick and choose.
If you strum these chords, you can begin to hear the song emerge from them. This is a good way to begin to understand what you are playing. Notice all of these chords are played one note at a time in quick succession. This is a little trickier than just plucking the notes at the same time, but it adds greatly to the song. It is a little more demanding. You could start by just plucking all the notes at once, and then after you get the feel of this, start to add in the additional complexity.
The dark line represents a pull off. You do not strike the string when you play the open B note, but instead you pull off the note with your third finger on the fretboard hand and the physical act of pulling off the string, makes it sound (hopefully). You actually sound the note with your fretboard hand. Then the second time you hit the open B string, you do so with your picking hand. Notice this line ends with octaves of E.
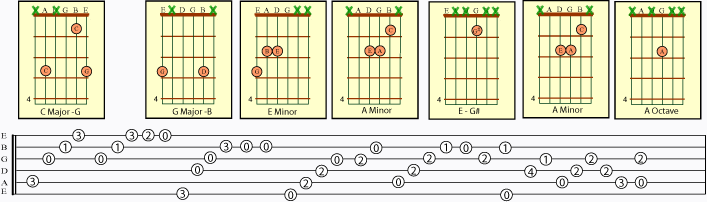
The First Line - Picking Hand
This tablature below will show you what fingers to use. The dots are in the same place as the tab above but now we are outlining the right hand finger assignments (for a right handed guitarist). Notice we start out playing the middle four strings, then we move up and play the upper four strings, however the thumb continues to play the A bass note. This can be a little tricky if your finger picking needs work. It is very helpful to be able to change "three string sets" while picking. If you have trouble with this, isolate the movements and practice them until it becomes fluid. This alone could take several days.
Listen to Line 1
If you play using these exact finger assignments, you will be able to confidently control your hand and play all the notes as they show up.

The Second Line
The first and second lines are very similar. The difference is in the way they end. Practice each of these separately until you are comfortable with both and then stitch the song together. Notice this line ends with an A octave (tonic). This brings to piece to rest and is the biggest hint so far that this song is in the key of A minor. There is a definite rhythm to the picking to this song.
Towards the end of this line, the first non key note shows up. The G# is not in the key of A minor. Although your ear may not pick up on this right away, if you pay attention to this, you may begin to hear that it is outside the key. This kind of note can confuse someone into thinking this song is in another key, but if you look closely you will see other than these few stray notes, the song conforms to A minor and the A minor chord as well as the A note brings this piece to rest. Lots of songs will contain a few notes outside the key.
Listen to Line 2
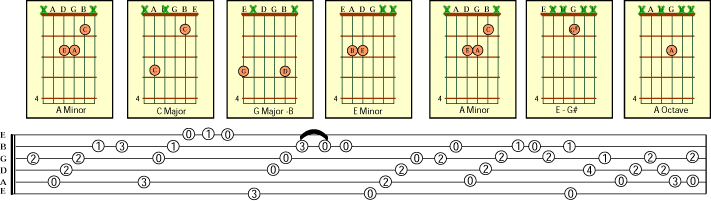
The Second Line - Picking Hand
The picking in this line is a little more complicated than the first. The ending is pretty involved, I suggest you approach this without speed so you get comfortable with the mechanics first. Once you get used to moving your hand and using the correct strings, this song will begin to fall into place. Proceeding slowly will quicken this. This arrangement is demanding of both hands and offers a great chance to mix right and left hand techniques and work through increasing technical difficulty. There is an example of an alternate strategy below that will apply to this line too.
When you listen to this song you may hear a few notes that were not right on the money in this line. There are some important things to hear and notice. When you try to get everything to work together, you will find each hand relies on the other to do it's part. If they both do, music will follow. If one hand does not execute properly, it may cause the other hand to make a mistake. It may be slightly slower to hit the string which can force the other hand into adjusting, in the hopes of keeping the song going. When this adjustment happens, this often times causes a slight breakdown in coordination and a mistake appears. In this case it is a few notes that buzz. The slight breakdown in this line was caused by my picking hand being not properly warmed up which caused me to take some attention from my fretboard hand, which then allowed some notes to buzz. Before I warm up, small issues of exact finger placement can show up. I recorded this when I was in the process of warming up so you could hear these imperfections.
It is important to trace problems back to the very roots so you can fix them. Sometimes the dynamics get intense enough to mask the true problem. Until the song is totally learned there will always be some struggle with playing every last detail perfectly.

The Third Line
This first chord is a little more difficult to figure out how why it works. It actually works like a G chord, particularly when you see the following run contain an F# note. The G chord is in the key of A minor and since the F# is in the key of G, it does not stand out as wrong. The song starts to move towards the key of G major. Once this chord is completed we go back into only notes in the key of A minor. This pulls the song back to the A minor tonal center. The notes outside the key actually insert quite a bit of interest.
Notice the E minor chord is now played with a G base note. This is probably the most difficult stretch in this song. You have to listen closely to hear the contribution of this G bass note.
The ending of the third line is taken from the first line. It ends with the E octave. This reinforces the progression in the first line and you ear will identify this. This ties the song together. The same thing happens with line 2 and 4 with the A octave notes. Make sure you continue to look at the notes played in relation to the key of A minor. You can clearly see this song is carved right out of the key. It is along this line of reasoning that the Diatonic Signature provides some of the biggest tools for understanding and creating songs. You are actually working with the palette of available notes when you learn the key. Then you apply the available notes in order to create the song. It is the basis of song writing, at least the guitar part.
Listen to Line 3
The Third Line - Picking Hand
See how orderly the picking is within these lines. Use the strategy of your thumb covers the three lower bass strings and each of your first three fingers is responsible for one treble string. After you practice this for awhile, you will find this strategy provides the framework for consistent picking. This can help you lock in the exact movements with confidence. This skill also transfers to the next song of this type, you try to learn.
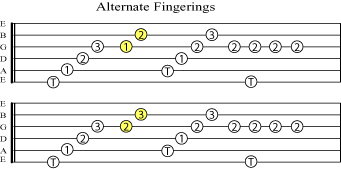 Alternate
fingerings. Here is a passage that I actually play two different
ways. The differences are shown in yellow. The bottom way is actually
the correct way. Using fingers two and three is better because they
will be used in the very next sequence and they are already lined up.
Alternate
fingerings. Here is a passage that I actually play two different
ways. The differences are shown in yellow. The bottom way is actually
the correct way. Using fingers two and three is better because they
will be used in the very next sequence and they are already lined up.
However there is a chance for a slight movement before this fingering and using fingers one and two seems to be quite comfortable. Make no mistake about it, this is a slight breakdown in discipline. In this example it may not come back to bite you, but in other instances it very well might. I am not only pointing this out as a breakdown and loss of control, but also because it actually is a realistic way to pick this. You have to strike a balance when you design the finger strategy of your own song or adjust an existing one. Usually I do not allow any deviation but there is more than one way to develop an exact critical path for finger placement. Usually one proves superior to the others.

The Fourth Line
The beginning of the fourth line is the same as the third. The main difference between the two are in the endings. Notice this song works within the framework of the E minor and A minor chords and ends with the A octave, which brings the entire piece to rest. Also notice the ending is grafted on this line from the second line. The first and third lines end with the E octaves which is the dominant note (5th degree) in the key of A minor. Then lines two and four end with the tonic octaves. This way the song bounces back and fourth between the fifth and the octave, while moving to other positions within each line. This creates a song that reinforces itself with movement and sound that strongly relates to the key.
The construction is simple, but there is enough complexity within the details to make this somewhat technically demanding. It also greatly contributes to the overall interest in listening. And all of this happens because someone was playing around with the A minor chord and constructed some nice progressions from basic tools. This is a good opportunity to point out that a song does not have to be overly complex to be good. Tasteful note selection is far more important than complexity or speed. It is the first thing your ear recognizes as desirable.
Listen to Line 4
Do you really think King Henry VIII wrote this song?
The Fourth Line - Picking Hand
Remember to play this slowly. There is a natural rhythm of the right hand when you play this. As you begin to stitch the various chording and picking, you should find micro spots to correct minor hand movement problems while you continue to play the song. I have always said finger picking without a pick is the easiest high level skill a guitarist can develop. There is nothing in the way of your fingers touching the strings, so as you gain mastery of your fingers they can lock in at a high level of skill easier than say using a pick in your finger picking.
So practicing finger picking patterns including arpeggios is an excellent way to develop your finger coordination. This will lead you to control this process and play this with a high level of confidence. Learning to finger pick is one of the easier ways to elevate your playing. It is a very important tool.

Practicing This Song
Start by isolating the various chording and picking patterns. Start with line one and get a firm grasp on this line from the beginning. The other three will be very similar to this one. Once you can play the first few chords correctly, the song will start to fall in place.
Once you can play the song from end to end, pound it. Be relentless. Play it ten times in a row without stopping. Play it 50 times each day for two weeks. If you have certain problem areas, then stop, isolate the problem area and pound that area SLOWLY. The more times you repeat this, the better you will physically understand it. If you continue to have a problem in one area, stop everything else and focus on that only. Spend 30 minutes on that one area if you have to. Make sure you identify all the sticking points and smooth them out. Do not allow bad habits to persist. If you clean them up now, your fingers will bring that discipline to all other songs you play from this point forward. If you are an advanced beginner or intermediate, there is a huge benefit from playing this well and you probably cannot see it now.
Sometimes one hand will experience a problem and cause the other hand to break down. It is important to identify the primary reason why a problem repeats itself. Sometimes it is as simple as making sure your fretboard hand is hitting the chords correctly. Until you do this, your picking hand may insert a mistake every time your fretboard hand plays this chord and you might think the problem is with your picking, when in fact your fretboard hand is breaking down and your picking suit then breaks down too. These things are fragile at first. Clean up the primary reason and move that problem out of the way. When you do this enough times, you will find you have removed all the barriers and then, all of the sudden, you can play the piece correctly. Then every time you play it, you reinforce the correct finger strategies and movement and this causes you to dial the song in.
If you are interested in exploring proper technique, consider Uncle Tim's First Year. It will provide the necessary background and exercises for picking hand development. It is often times helpful to forget what you are trying to learn for a while, and go focus on the basics of what skill you are trying to use to play the song. Finger picking works this way. If you are fumbling with hitting the strings correctly and it is distracting you from playing correctly, then stop and focus on your picking. Clean it up right there and it will make a world of difference.
Home | FAQ | Purchase | UTFY | UTBB | UTBC | Tools | Flash Scales | Flash Chords | Video Scales | Newsletter | Reader Comments | About Us | Guitar Lessons | Teaching Center | eBooks | String a Guitar | Quick Guides | Search | Contact | Privacy Policy | Guarantee | Links | Login | Help Desk | Site Map
